Monday, February 8, 2010

The Puppy and The Pea, or, How To Make A Dog Bed

This is Ulrich.


This was Ulrich a few months ago.


He's adorable, this is fact.


However, despite his clear future as a doggie model and heartbreaker known the world over, Ulrich is not allowed on the furniture.

He knows this.

And he's usually pretty good, but at certain vulnerable times -- like, when P is distracted by the computer or A first gets home from boarding school for a long weekend -- Ulrich will sometimes try to take advantage of the situation. He gracefully leaps onto the down-filled couch, with total disregard for its pristine WHITE upholstery, and curls up into as tiny a ball as he possibly can, which at this point isn't too small. He then puts his head on his paws and looks up at any passerby with the pleading puppy-dog eyes that say, "Oh, but you just wouldn't disturb me, would you? I'm so cute and comfortable."

It is a trial, let me tell you, to break through the shield of cuteness and exile him to the stone floor. It just wasn't right.

So, in search of a compromise, I grabbed my sister and headed to Petco in hopes of finding a big fluffy dog bed that would somehow soften the harsh realities of puppyhood.

Have you gone dog-bed shopping recently? WHAT IN THE WORLD IS WRONG WITH THESE PEOPLE?

$70 for a dog bed?! $125 for one large enough for Ulrich?! You've got to be kidding me. It's a glorified couch cushion.

Turns out, we had some pillows hanging around the house which had seen better days, and the $1 a yard cloth bin at Walmart yielded some fairly non-hideous fabric.

Here goes somethin'.


Ingredients:

1. A sewing machine. Here's mine:


There is also a child in that photo of my sewing machine. She lives here, eats my food and keeps referring to me as her "stepmom". Weird. She's spending quality time watching "Millionaire Matchmaker." See, we only allow the viewing of high-quality television around here. It's edu-tainment or nothin'.

2. Some old pillows and a few yards of fabric. I used four old pillows and three yards of fabric, but presumably not every dog is going to be as big as mine.


Instructions:

1. Choose what size you want your dog bed to be, and trim the fabric to near that size. It could be a circle or a rectangle or whatever. If your fabric has an obvious "outside", then make sure to line up the top and bottom pieces of the fabric with the "outsides" touching each other. That way when you turn it inside out, it's actually right side out. Get it?

2. Gut all your extra pillows. I learned in this process that the insides of pillows are actually rolled up fluff, like a swiss roll. Mmm...delicious.


Optional dessert break.

3. Sew up most of the fabric sides, leaving about a foot unsewn. Turn the whole thing inside out so that the seams are inside and it's like a big pillowcase. Stuff it with the fluff. Sew up the stuffin' hole.

4. Show it to the dog!


And the best part: it only cost me $3.97.

Sunday, February 7, 2010

So Long, Sushi...For Now.


I really miss eating sushi. It used to be a regular with me, and now I'm stuck getting noodle soup while P orders some tantalizing plate of colorful rolls then dips them decadently in wasabi and soy sauce.


I'm obedient though, and my doctor told me to abstain while pregnant. And I get the whole raw-fish-is-at-higher-risk-for-bacteria argument, I do.


But my question is this: What are all the Japanese preggos doing?! Are you telling me that THEY aren't eating sushi for nine months?


If so, I don't believe you.


So, because I'm seriously questioning my doctor's recommendation and was perched precariously on the verge of giving up and giving in over the weekend, I've decided:

While all the other Catholics are struggling with pescetarian Fridays, my Lenten obligation will be distinctly less fishy.


Sushi, I really won't be seeing you until at least after Easter. Let's just hope by them I'm not past the point of nori turn. (heh. I couldn't restrain myself.)

Is that tempura in your belly, or are you just happy sashimi? (Jim Carrey)

Regrouping and Potato Souping


I'm pleased to announce that I think I may be back in the saddle again. Ridin' along, cooking and and breaking/fixing things, and sharing my adventures with The Internets.


For a while there, between morning sickness and the general lethargy that ensued, things were looking dire for the dear old Impractical Guide. But I'm back! Mostly...


I still experience severe stomach-lurchery at the very whiff of garlic. Back in the fall I bought a bag of garlic at the local farmer's market, which I kept in a pretty little (well, medium sized) olive-wood bowl on my kitchen island. I never really noticed the smell of it until duh duh DUH the baby hangin' out in my womb made it abundantly clear that good ol' allium sativum is not a welcome part of its gestastion process. Initially, bowl and all were banished to the far recesses of the hall closet (the catch-all for kitchen miscellany), but even that wasn't enough. I put it up for adoption, and C very lovingly took all 9 heads home to live with her.


So here I am, cooking up a storm with NO GARLIC. It's very strange, I agree.


Side note, I've also developed a serious sweet tooth for the first time in my life.


Last night my twin-law and his son, B, were over for dinner. Both have extremely conservative stomachs, so it's sort of a fun challenge to come up with food that is both fun and interesting and that they will readily eat. Mostly B, with the not-eating. B is extremely thin and as any good Southern woman would, I feel the need to shove food at him every 5 seconds.


Finally able to cope with the combination of standing in front of the stove and smelling the food bubbling away there, I went all out. We had Baked Potato Soup (new recipe, totally delish), steamed brussel sprouts, grilled Baja-citrus style shrimp, and NY strip steak from White Flower Farms. Plus we had a wonderful smoked gouda cheese, fresh french bread, crudites and a green salad.


I'm only just getting the hang of cooking steaks, but by all accounts (and by accounts I mean empty plates) the steak last night was very good. I can officially now plan to have steak for dinner without hyperventillating, which is significant progress from a year ago. I didn't grow up in a frequently steak-eating family, and my memories of steak dinners consist of my Dad (not the usual cook in the house, although quite good when he wants to be) taking himself very seriously at the stove AND oven, executing some very complicated kind of beef ballet between the two which involved filling the kitchen, dining room and living room with dense smoke.


Rather intimidating, you might say. And you would be right.


However, I've faced that fear head on and discovered that if you have a good raw steak (ie, a good cut of meat to begin with) it's pretty hard to mess it up too much. The 200lbs of grass-fed beef that we've been working our way through this winter is amazing. AMAZING.


Just grill those suckers up on a hot grill pan, and plop a little thing of butter on them while you keep'um hot in the oven. In this particular case I used some Habenero flavored compound butter I got at the Garlic Festival, but don't tell the baby.


Here's the recipe for the Baked Potato Soup, adapted by me from Playing House.


Yeild: about 8 cups

4 baking potatoes (about 2 1/2 pounds)

2/3 cup all-purpose flour

6 cups 2% milk

1 cup (4 ounces) shredded extra sharp cheddar cheese

2 teaspoon salt

1/2 teaspoon freshly ground black pepper

2-3 shakes of Lawry's Seasoned salt

1/2 teaspoon of garlic powder

1 cup reduced-fat sour cream

3/4 cup chopped green onions, with some extra for garnishing


1. First, poke holes in the potatoes and bake them in the oven for an hour. You could probably cut time by using the microwave for this step, I'm not really sure.


2. Put the flour in a large, thick bottomed pot, and slowly add the milk to it, whisking at first to prevent lumps. Heat the milk until bubbly and stir frequently to avoid a buildup of film on the bottom of the pan.


3. Put on some oven mits and take the potatoes out of the oven. (Game of Hot Potato optional here.) On a cutting board, chop them up into smallish pieces. The baked potato skins can be kind of tough, so if the idea of having them in your soup bothers you, they're pretty easy to pick off: cut the potatoes into quarters and peel the skin off to discard. I personally like potato skin, so I left about half of mine in, and just made sure it was cut up into small enough pieces that it would get softened by the soup itself.


4. Dump the potato into the milk. Add everything else, too. Stir until the cheese is melted and to further break down the potato pieces. Let it cook for about 10 or 15 minutes on medium-low heat, stirring occasionally, until it gets thick. Taste it, and season to your taste. I think I may have put more salt in mine (I didn't measure) but I'll leave that to you.


To serve, I actually put mine in some stemless wine glasses that we have because I don't have enough smaller bowls to serve 6 people. Garnish with some extra green onions or grated cheese. Or bacon.


Bacon makes everything better. Or is that butter?

Sunday, January 17, 2010

A Little Advice, or, Preventative Maintenance

It’s not too surprising that when, a few days ago, my bedroom curtain wall came crashing down around our ears, I fudged a way to fix it for the short term. I’m all about making things nice and lovely, but sometimes that doesn’t happen until … later.

It’s even less surprising that my temporary solution involved a book – I mean, talk about a staple resource in our house. Books are the ubiquitous handy solutions for all of our domestic problems. Need a coaster? Use a book. Need a leg up? Use a stack of books. Need to load a catapult? You get the idea.

Only one of my curtain bolts pulled out of the ceiling (because, for reasons probably involving divine intervention, the other two were magically in studs I just didn’t know about), so two thirds of the curtain was still held up. The problem was propping up the one end that fell and which was, of course, responsible for holding the heaviest part of the curtains themselves. So, I wedged a book between a horizontal piece of trim and rested the curtain rod on it. Done.

Breathing a sigh of relief, I went about my day, which included exciting things like cleaning up the coffee spill of the century, restringing HC’s guitar, cooking dinner while holding back “morning” sickness –misnomer of the millennium – and writing an article for P (pshh what is this “job” he keeps referring to?!).

The book situation may or may not have made do for, say...a day. Or two.

Okay, three.

However, I would like to point out that I GOT TO IT AFTER DAY THREE. Three days was enough of not being able to have a peek of the sunlit, snow covered courtyard, and having to walk all the way around to the other side of the house to let the cats in. AND I got to it after the following real-life conversation:


P walks in, eyes the curtains and says: Oh, I thought those were broken.

Me: They are.

P: They don’t look broken.

Me: They are. They’re just propped up on that book.

P: Oh. Well it looks like that’s working pretty well. *short pause* Maybe instead of fixing it we could just get a nicer looking book…[emphasis added]


Seriously?! Seriously. This, from the man who is always telling me that one of the many joys of being WASPS (which, for the record, I am not), is that we initiate preventative maintenance.

At any rate, fixing the curtain was far more involved than I initially anticipated. C and I dove in head first.


Step 1. Unscrew both remaining pipe hangers so that release the curtain rod.

Step 2. Carefully lower the curtain to the ground, so that the curtain hooks stay on the curtain rings and won’t have to be counted out and rethreaded later.

Step 3. Watch as all of the curtain hooks fall out of the rings as soon as the rod touches the floor.

Step 4. Consider this a bad omen.


Upon further inspection of the wounded ceiling, we discovered that our problems were threefold:


1. There is no stud within a 10 inch distance of where the bolt needs to be driving into the ceiling. Given the semi-permanent nature of the rod-hanging situation, moving the bolt horizontally along the curtain rod until we find a stud would dramatically hinder the opening and closing of the curtain itself, making it so that we would need to leave the heavy curtain closed over the sliding glass door at all times. Awkward.

2. Directly above the ceiling in my room is currently the attic. This has not always been the case. As I may have mentioned before, this was once a flat-roofed house. When our predecessors decided to add a hip roof (hipped roof? Whatever.), they just plopped it right down on top of the old flat roof, without removing any of the many layers of tar, paper, gravel and other stuff that was piled up on there. So, the floor of our attic is literally what used to be the top of the house that was exposed to the elements. This we only discovered (remembered) after attempting to drill through the ceiling in order to install a drywall anchor and gravel started falling through the drill hole. I went upstairs to investigate and discovered that, in order to reach any kind of space where the little umbrella top of the drywall anchor could open up and support itself, we needed about a two-foot long bolt in a hole drilled a two-and-a-half-foot long drill bit. Not only do I not have either one of those things, but I don't plan on acquiring them.

3. Now that we had eliminated both the possibility of screwing into a stud AND sinking an anchor, there was an even more ominous, gaping hole in the ceiling, out of which gravel and tar paper would occasionally fall.


We experimented with the idea of working from the attic down, thereby eliminating the gravel-falling-in-eyes problem we were (literally) facing when attempting to drill up into the ceiling. About two minutes of poking around in the attic pretty much convinced me that wasn’t doable, and furthermore it didn’t solve the two-foot-bolt issue.

Of course the when we finally came up with a workable solution, it was far simpler than either of the previous ideas.

We took ourselves and the dog down to the hardware store and bought one simple piece of hardware, along with some spray paint (does anyone else feel like spraypaint should be one word? Spellcheck doesn’t. Spellcheck doesn’t think that Spellcheck should be one word either. Who elected this program king of grammar anyway?).

We went home, and C painted it while I reclined and ate Chef Boyardee lasagna straight out the can. Don’t judge. She likes spraypainting. I think.

The next day, I used three simple, normal sized screws to secure it in place. I hung the rod. It stayed up. I hung the 80 million pound curtains. It still stayed up. It was a miracle.

What was this incredible device, you ask?

Oh, you know. Just something made for EXACTLY THIS PURPOSE.
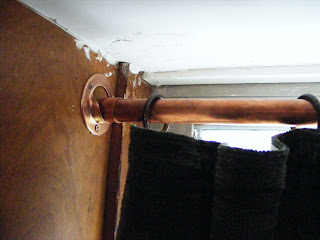

The guy at the hardware store assures me that this little guy will hold up to 400lbs, which is well above the weight I’ve loaded on. I’m keeping my fingers crossed that he’s right.

(Please ignore the unfinished patch job, sloppy paint splatters and unfilled holes in the wood. One project at a time, people. Plus, it’s like 7ft in the air and nobody in real life notices anyway. Or at least that’s what I tell myself.)

A LITTLE ADVICE: Think outside the box. But read the box first. If it says "premium heavy duty closet rod bracket" on the outside, you may as well try thinking inside the box for a while, just to see what happens.

Thursday, January 14, 2010

I Really Need A Second Floor.

Just for this:

O. M. G.


and this:


These stairs should have been my New Years Resolution.

Thanks, daddytypes.

Wednesday, January 13, 2010

A Little Advice, or The Difference Between a Stud and a StudMuffin

Last summer, I came up with the most brilliant idea.

The. Most. Brilliant.

That is...until my idea literally came crashing down around my darling husband's head today.

Here's the thing. I love my house. We live in New England where every house is an adorable colonial with history and shutters. The first time I saw my current hometown, I thought two things:

1) "Wow, and I thought Gilmore Girls was fake,"

and

2) is that house on the left from Father of the Bride?

I was right on half. Gilmore Girls is based on my area, and they mention my town occasionally. It's awesome.

Father of the Bride on the other hand, was filmed in Pasadena, but whatever.

My house is a different story. Very. It was built by a local architect in the 1960's and it is definitely a product of its age. It is brick (very unusual around here) and originally had a flat roof - very modern. The layout is similar to a Roman villa, with three sides of the house enclosing an interior courtyard in the middle. There is lots of floor to ceiling glass and exposed brick walls. I LOVE IT. When we bought it, I tracked down the original architect to do the updating we needed. He is now 85 years old, and three years ago when I made that phonecall, he said "Well, I'm retired and I only work for old friends. At this point all my old friends are houses." He did a great job.

But let's be honest, this is Connecticut. It's gets really cold here, and double paned or not there's a heat-loss situation. Also, as wonderful as I think it is to have an entire wall of my bedroom be glass, I doubt anyone in the family really wants to be able to see straight from the dining table or living room sofa into my boudoir.

So, after almost a full year of sporting an awesome flattened-cardboard-taped-to-glass style of window treatment which I thought for sure would be a neighborhood trend-setter, I sucked it up and went curtain shopping.

Oh, the horrors.

First of all, I was clearly not made for interior design work. I like colors, and I have clear taste. But at the intersection of Indecisive and Overwhelmed, you find me. Plus, I had no idea how expensive curtains could be. For the length of curtain rod I needed, (and because it is literally as wall of glass, I needed to hang it from the ceiling) I was looking at a couple hundred dollars for a rod that looked like it was ten bucks. And that doesn't even come with a curtain!

Well, my Mama didn't teach me how to make do for nothin'!

I invented. After a few visits to Home Depot, here's what I came up with. (Disclaimer: I'm a girl, so these may not be what the things are *actually* called in the construction industry. But these names for them make sense to me. So there.)

  • 2 lengths of copper plumping pipe; 10' and 5', respectively:
  • 1 copper pipe connector sleeve
  • 3 two piece pipe hanging clamps like this one:
  • 3 double ended bolts, like these:
  • 2 copper pipe caps
  • 1 hack saw

So, I measured carefully and cut the pipe to length with the hacksaw. P was very impressed with my cutting skills.

Then, I covered up the tattered-looking end where I had just cut, as well as the nice clean other end, with the caps. I connected the two pieces of pipe with the connector thing.

Voila, curtain rod!

Next, I drilled the pointy (ei, intended for wood) end of the bolts into the ceiling* where I wanted them. I had to use three since the rod was so long and my curtain is quite heavy. Then, the other non-pointy ends of the bolts were hooked up with the pipe holder/clampy things. This made three rod-holding things hanging from the ceiling. All I had to do to finish it up was mount the rod in the clamp hangers and

Voila, a ceiling mounted curtain rod!

Now, making the curtains was a different story -- their sheer size almost defeated me. They're heavy dark mossy green chenille (gorgeous!) lined with cream colored cotton. I think I almost developed biceps from lifting them up and down. I've never felt so victorious as when I finally hung those suckers.

They looked BEAUTIFUL if I do say so myself. My real estate agent came over and was literally shocked speechless when I told her I made the all by myself.

Here's a picture of the final product:

Not too shabby for a girl with limited power tool experience, eh? See how the small copper pipe just disappears up there, and even matches the more reddish tones of the cork floor? Don't you think the visible bolts give it a kind of industrial-chic? Yes. You do.


*You knew there was a catch, right? Well, here it is. You see, when I told you that I drilled the bolts into the ceiling, I was being honest. I just drilled those suckers in. No pre-drilled holes for me, no way. More importantly though, no drywall anchors or stud-finding either.

Who needs a stud, you ask, when I have P hanging around all the time? I would ask myself the same question if my own Studmuffin hadn't gotten brained this morning when one of the bolts stripped out of the ceiling drywall, bringing down the curtain rod and 30lbs of curtain with it.

Currently the rod is wedged up with a book holding it in place, patiently waiting for me to install the drywall anchors, since the idea of moving the bolts to studded locations and thus mess up the zen of my curtain pulls is about as appealing as chimney sweeping.

Tomorrow, I install the anchors. Then everything will be fine.


Right? RIGHT??

Thursday, January 7, 2010

Committments are Tough

Given that it's now officially a week into January (Happy Birthday, R!), I guess my the idea of posting my new years resolutions is a bit overdue, especially since one of my ideas was to procrastinate less.

Here's the thing though: I'm not feeling very motivated. Resolutions are supposed to be solid, compelling pieces of self-improvement. They're supposed to motivate you for at least like three weeks. They are supposed to be...well...resolute. I am not feeling resolute.

Which makes me wonder: how do I both make a New Years resolution and keep it? I don't even remember what my resolution was last year (curse less? possibly?) let alone judge whether or not I kept it. One possibility is to tone down the whole resolution situation and settle on some New Years suggestions instead.That way I can take them under consideration, acknowledge their intentions and then have the option of just moving on.

Or, (and?) I could just lower the bar a bit. Weight loss? Forget it. I'm having a baby. Stop procrastinating? Maybe next year. Vacuum the house more? Eh...vacuuming is kinda loud, and my cleaning lady really loves her job. Seriously. She does. It's sick.

Eat more carbs?
Now we're talkin'.


WISHFUL THINKING'S OFFICIAL 2010 NEW YEARS SUGGESTIONS LIST

1. File my nails more. They're really ragged a lot.

2. Keep up the home-cookin'. Actually, you have no idea how hard this one is to keep right now. It's right up there with "reduce the whining" and "get out of pajamas" on the "virtually impossible things to do while in the first trimester" list. Except that I occasionally feel pangs of guilt when the answer to the ubiquitous "What's for dinner?" question is "Takeout." For an entire week.

3. Buy some more socks. P's toes are feeling a little too exposed these winter months. I should get on that.

4. Figure out a more appropriate guest room. Right now we only have bunk beds, which kinda puts a damper on our having anyone over the age of 15 come visit. Perhaps I can delegate this suggestion to a local husband...

5. Read more books. This one should be pretty easy to keep up with, since getting out of bed is sure to prove more and more of a problem.

6. Stop and appreciate the patience of my family and friends. And by that I mean, pause between complaining sessions and thank them for listening. Then get back to it.

and last, but certainly not least

7. Get the landscaping and gardens under control. Whoa. That's pretty serious. It sound an awful lot like hard work. It scares me.

But you know what? It's just a suggestion.